Chapter 4 Remote Kinetic EFM Dataflows
Prerequisites
Ensure you have completed all the steps in the following documents before continuing:
You should still be in the Dataflow Editor interface from the previous chapter.
Create Demo Dataflows on the Remote Broker
Connect to the ParStream Server
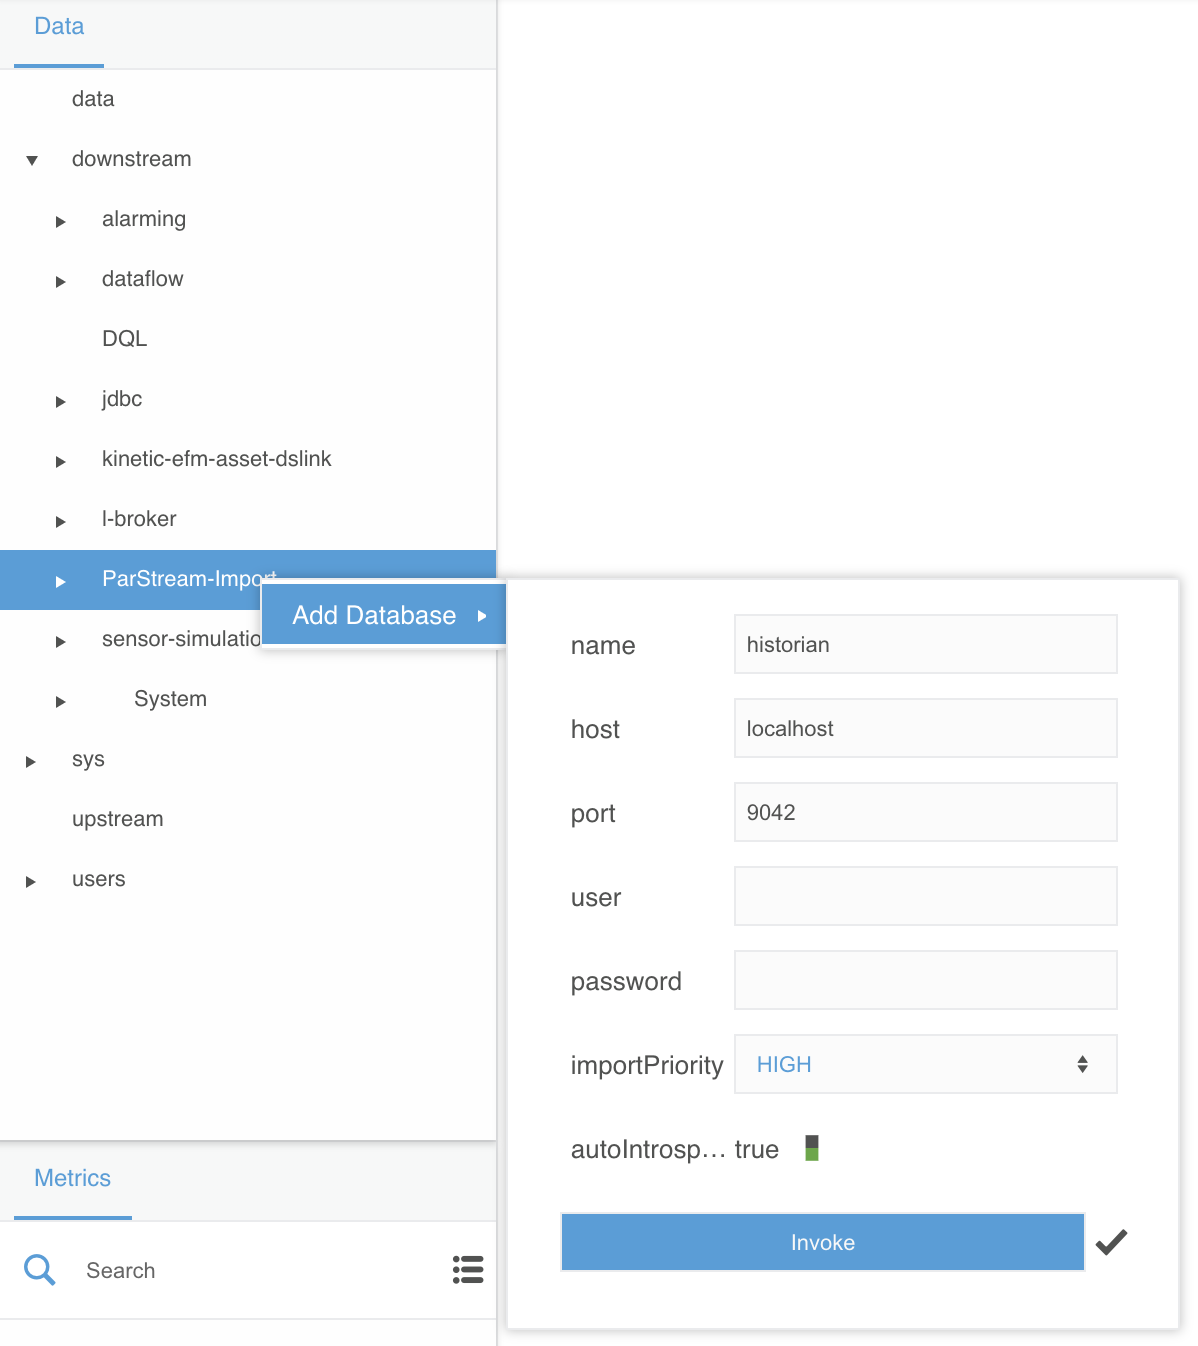
- Navigate to
Data > downstream > ParStream-Import - Right-click on
ParStream-Importand selectAdd Database - Use the following options:
- name:
historian - host:
localhost - port:
9042 - user: (blank)
- password: (blank)
- importPriority:
HIGH - autoIntrospect:
true - click
Invoke
Save All Control Data to ParStream
- Select
Data > downstream > dataflow
We are creating these next dataflows on the remote broker, which is where the ParStream database resides and where the ParStream connection is configured above. This makes sense given the main purpose of the remote broker is to aggregate the data from local brokers.
- Right-click on
dataflowand selectCreate Dataflow - Name the dataflow
save-all-control-dataand clickInvoke - Expand
... > dataflow > save-all-control-data - Open the
save-all-control-datadataflow in the right-hand editor workspace by clicking on its dataflow icon - Under the
Blockssection, dragTable Operations > JSON Parserto the editor workspaceDataflowsection - Double-click on the new block and rename
jsonParsertoparsed-control-data - Navigate to
... > downstream > DQL - Right-click on
DQLand dragQueryto the editor workspaceDataflowsection
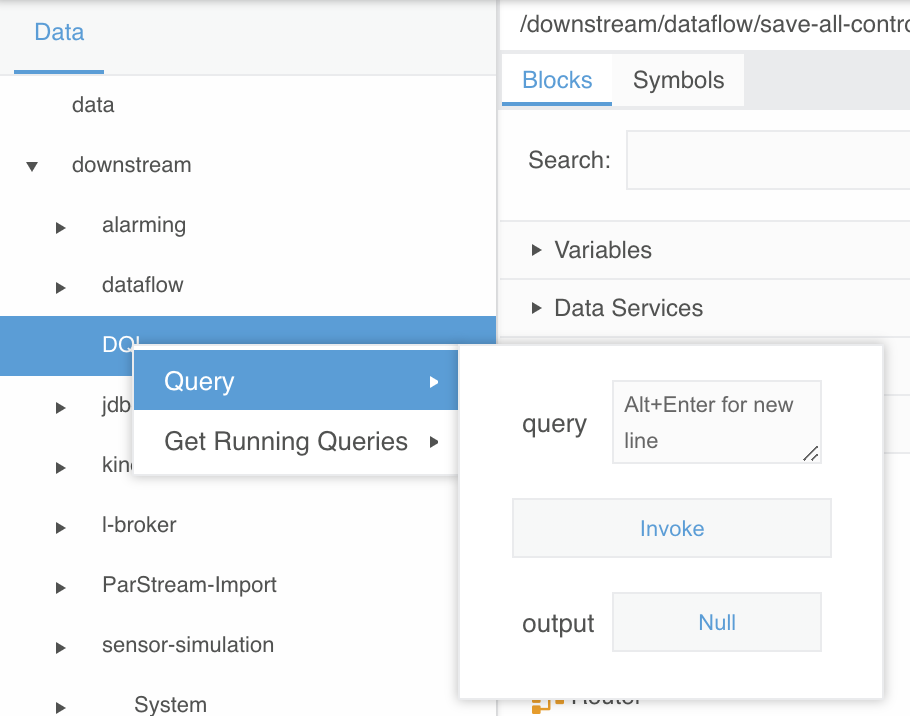
- Double-click on the new block and rename
querytoget-all-control-data - Select
get-all-control-dataand edit the following values in the right-handPropertiessection:
- interval:
30 - query:
list brokers | sublist /data/control/? | subscribe value.timestamp as timestamp, value
This is Distributed Query Language (DQL), which provides a powerful, flexible way to extract published data throughout all the brokers within an EFM deployment. This particular DQL query gets any
controldata published by any broker the remote broker knows about. In this lab environment, the only other broker is the local broker you configured previously.
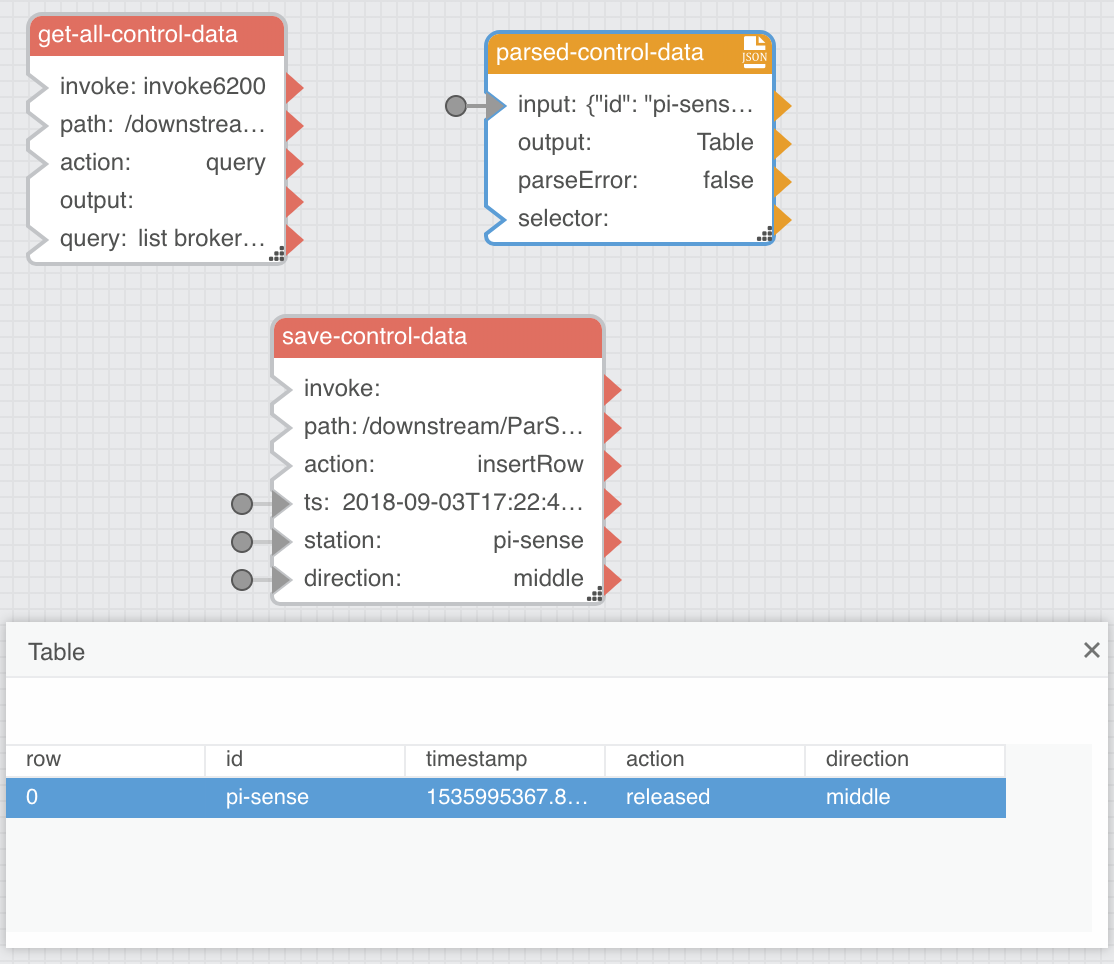
- Click the
Invokebutton associated with theinvokefield - Click the
Tablebutton associated with theoutputfield - Drag the value in row 0 for the
valuecolumn to the parsed-control-datainputfield

If you don’t see any data in the table, actuate the Sense HAT joystick to have the
publish-local-controldataflow on the local broker send data.
- Close the table
- Navigate to
... > downstream > ParStream-Import > historian > Tables > control_data
If you don’t see the
control_datatable listed, right-click onhistorianand selectIntrospectand then check again.
- Right-click on
control_dataand dragInsert Rowto the editor workspaceDataflowsection

- Double-click on the new block and rename
insertRowtosave-control-data - Select
save-control-dataand edit the following values in the right-handPropertiessection:
- autoRun:
true
- Select
get-all-control-dataand click theTablebutton associated with theoutputfield in thePropertiessection - Drag the value in row 0 for the
timestampcolumn to the save-crash-datatsfield

- Close the table
- Select
parsed-control-dataand click theTablebutton associated with theoutputfield in thePropertiessection - Link the table values in row 0 to the associated column field inputs for
save-control-data
- Drag the
idvalue to the save-control-datastationfield - Drag the
directionvalue to the save-control-datadirectionfield
Since we are filtering on our local broker to only publish
released(i.e. completely pressed) joystick control actions we don’t need to store this column in thecontrol_dataParStream table.
- Close the table
You will fully confirm whether this dataflow is working correctly when you configure a dashboard in the next chapter. For now you should see the
save-control-datafields update when you actuate the Sense HAT and see a value ofINSERTEDfor theStatusfield in itsPropertiessection.
This dataflow saves all control data into the ParStream database to enable a use case where all data is considered operationally important. The next dataflow will show how to perform a moving average for cases where data trends are more important than the individual data points.

- Close the
save-all-control-datadataflow by clicking thexicon next to its name above the editor workspace
Save Sampled Sensor Data to ParStream
- Select
Data > downstream > dataflow - Right-click on
dataflowand selectCreate Dataflow - Name the dataflow
save-sampled-sensor-dataand clickInvoke - Expand
... > dataflow > save-sampled-sensor-data - Open the
save-sampled-sensor-datadataflow in the right-hand editor workspace by clicking on its dataflow icon - Under the
Blockssection, dragTable Operations > JSON Parserto the editor workspaceDataflowsection - Double-click on the new block and rename
jsonParsertoparsed-sensor-data - Navigate to
... > downstream > DQL - Right-click on
DQLand dragQueryto the editor workspaceDataflowsection - Double-click on the new block and rename
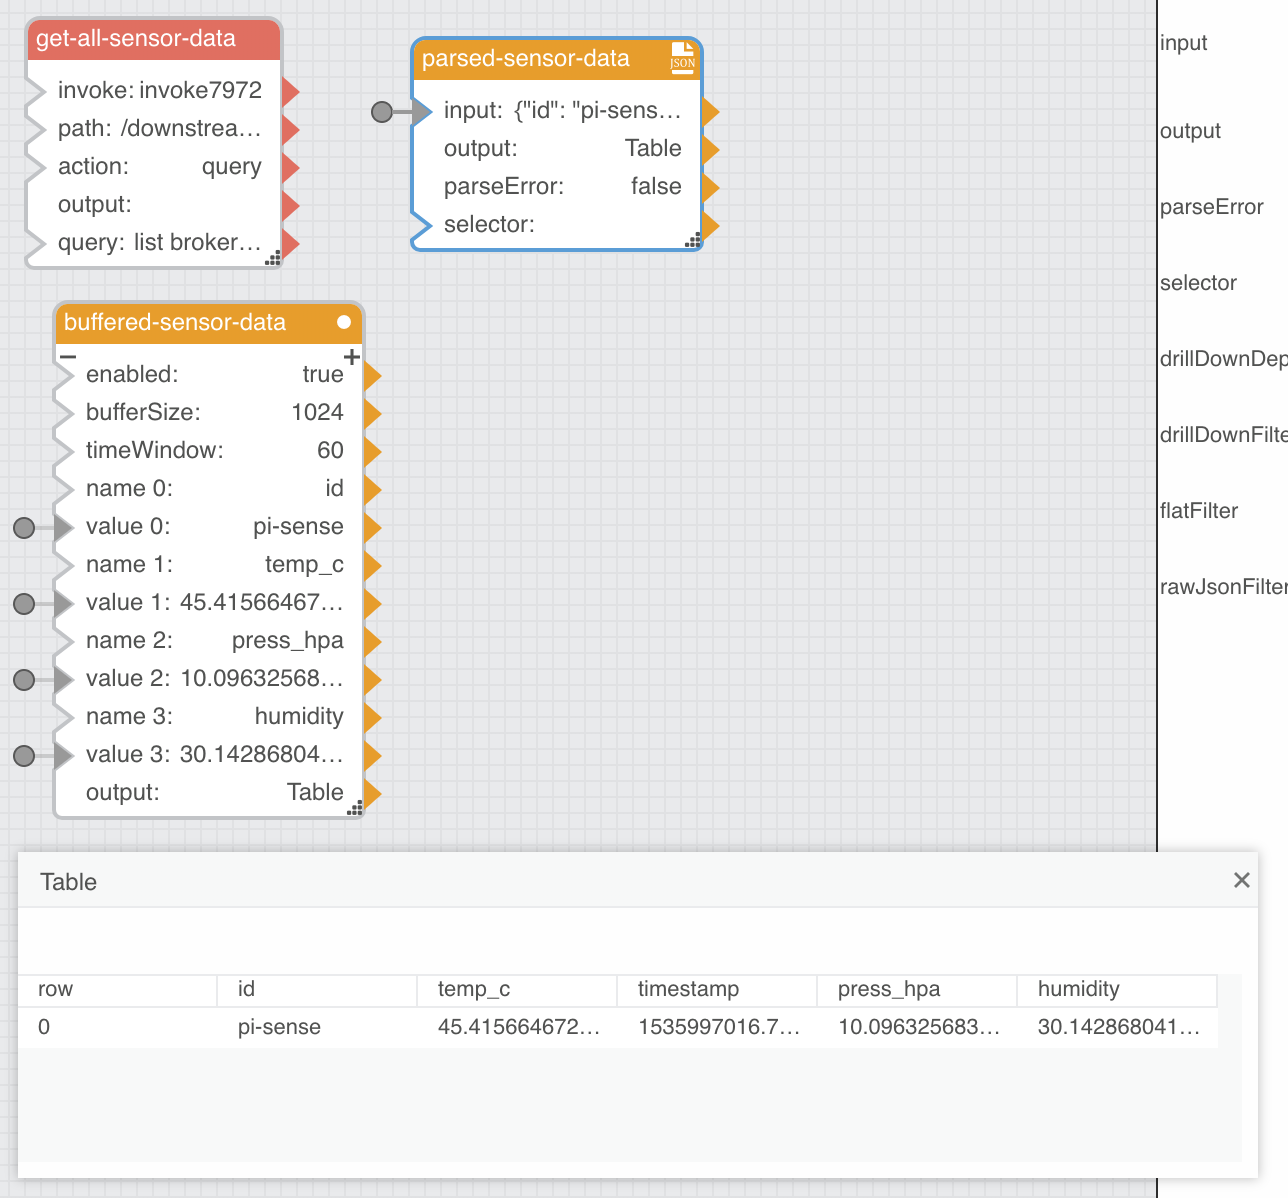
querytoget-all-sensor-data - Select
get-all-sensor-dataand edit the following values in the right-handPropertiessection:
- interval:
30 - query:
list brokers | sublist /data/sensor/? | subscribe
This DQL query gets any
sensordata published by any broker the remote broker knows about.
- Click the
Invokebutton associated with theinvokefield - Click the
Tablebutton associated with theoutputfield - Drag the value in row 0 for the
valuecolumn to the parsed-sensor-datainputfield
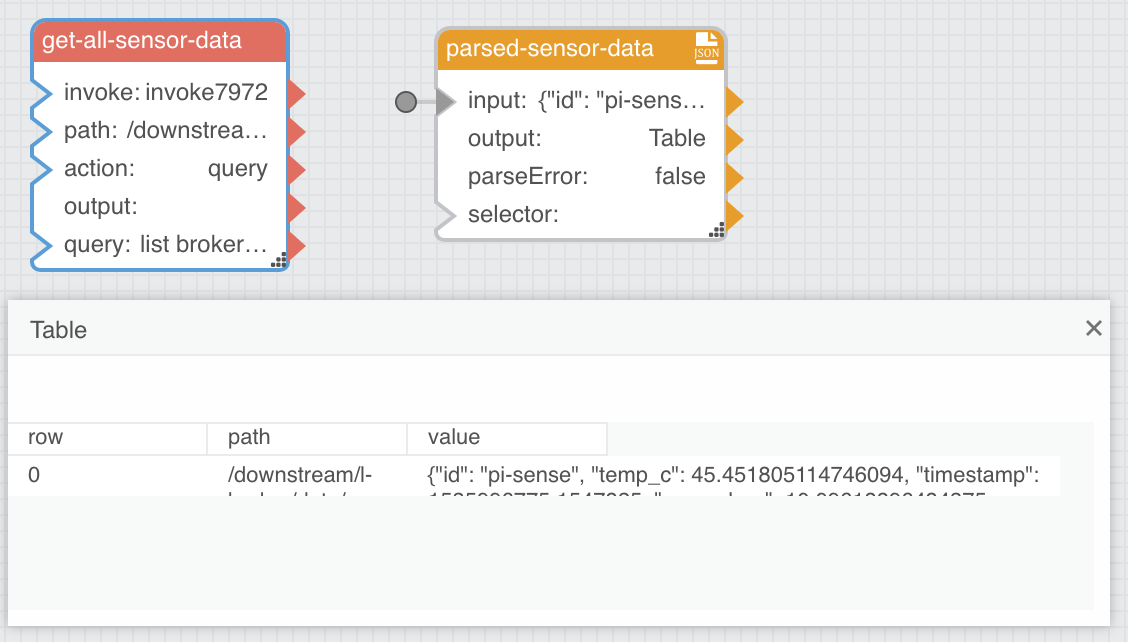
You should see this table data update every 3 seconds.
- Close the table
- Under the
Blockssection, dragTable Operations > Realtime Recorderto the editor workspaceDataflowsection
A
Realtime Recorderblock builds a table of data from individual data points over time.
- Double-click on the new block and rename
realtimeRecordertobuffered-sensor-data - Click on the small plus icon in the upper-right of the
buffered-sensor-datablock (3) times to add 3 morenameandvaluefields - Mouse over the blue dot associated with the
name 0field in thePropertiessection - Click it and check the
Pinnedbox - Mouse over the blue dot associated with the
value 0field in thePropertiessection - Click it and check the
Pinnedbox - Edit the following values in the right-hand
Propertiessection:
- timeWindow:
60 - name 0:
id - name 1:
temp_c - name 2:
press_hpa - name 3:
humidity
- Select
parsed-sensor-dataand click theTablebutton associated with theoutputfield in thePropertiessection - Link the table values in row 0 to the associated column field inputs for
buffered-sensor-data
- Drag the
idvalue to the buffered-sensor-datavalue 0field - Drag the
temp_cvalue to the buffered-sensor-datavalue 1field - Drag the
press_hpavalue to the buffered-sensor-datavalue 2field - Drag the
humidityvalue to the buffered-sensor-datavalue 3field
- Close the table
If you select the
buffered-sensor-datablock and click theTablebutton associated with theoutputfield in itsPropertiessection you will see that it is generating a table with 60 seconds of rolling sensor data. This table is the data source for the 60-second moving average that will ultimately end up saved into ParStream. This is an example of how EFM can intelligently sample data to drive insight and efficiency or otherwise enforce a customer’s desired operational policies.
- Under the
Blockssection, dragTables Operations > Aggregationto the editor workspaceDataflowsection
An
Aggregationblock aggregates columns of data into individual data points based on the specified operation (e.g. average, median, maximum value, last value, etc.)
- Double-click the new block and rename
tableAggregationtolast-ts - Select
last-tsand edit the following values in the right-handPropertiessection:
- column:
timestamp - method:
Last
- Link the buffered-sensor-data
outputfield to the last-tsinputfield - Under the
Blocks, dragDate Time Operations > Date Mathto the editor workspaceDataflowsection
A
Date Mathblock allows for adding and subtracting time periods from dates, however in this case it is used to normalize the timestamp into UTC, which automatically happens just by passing the timestamp “through” the block.
- Double-click the new block and rename
dateMathtots-to-utc - Select
ts-to-utcand unpin the following fields by right-clicking on the blue dot and unchecking thePinnedbox:
- op
- year
- month
- day
- hour
- minute
- second
- millisecond
This will make the block much smaller and easier to position in the editor workspace by only exposing the needed
inputandoutputfields.
- Link the last-ts
outputfield to the ts-to-utcinputfield

- Under the
Blockssection, dragTable Operations > Aggregationto the editor workspaceDataflowsection - Double-click the new block and rename
tableAggregation1toavg-temp_c - Select
avg-temp_cand edit the following values in the right-handPropertiessection:
- column:
temp_c - method:
Average
- Link the buffered-sensor-data
outputfield to the avg-temp_cinputfield - Under the
Blockssection, dragTable Operations > Aggregationto the editor workspaceDataflowsection - Double-click the new block and rename
tableAggregation2toavg-press_hpa - Select
avg-press_hpaand edit the following values in the right-handPropertiessection:
- column:
press_hpa - method:
Average
- Link the buffered-sensor-data
outputfield to the avg-press_hpainputfield - Under the
Blockssection, dragTable Operations > Aggregationto the editor workspaceDataflowsection - Double-click the new block and rename
tableAggregation3toavg-humidity - Select
avg-humidityand edit the following values in the right-handPropertiessection:
- column:
humidity - method:
Average
- Link the buffered-sensor-data
outputfield to the avg-humidityinputfield

- Navigate to
... > downstream > ParStream-Import > historian > Tables > sensor_data - Right-click on
sensor_dataand dragInsert Rowto the editor workspaceDataflowsection - Double-click on the new block and rename
insertRowtosave-sensor-data - Select
save-sensor-dataand edit the following values in the right-handPropertiessection:
- interval:
60
- Link the ts-to-utc
outputfield to the save-sensor-datatsfield - Link the buffered-sensor-data
value 0field to the save-sensor-datastationfield - Link the avg-temp_c
outputfield to the save-sensor-datatemp_cfield - Link the avg-press_hpa
outputfield the save-sensor-datapress_hpafield - Link the avg-humidity
outputfield to the save-sensor-datahumidityfield
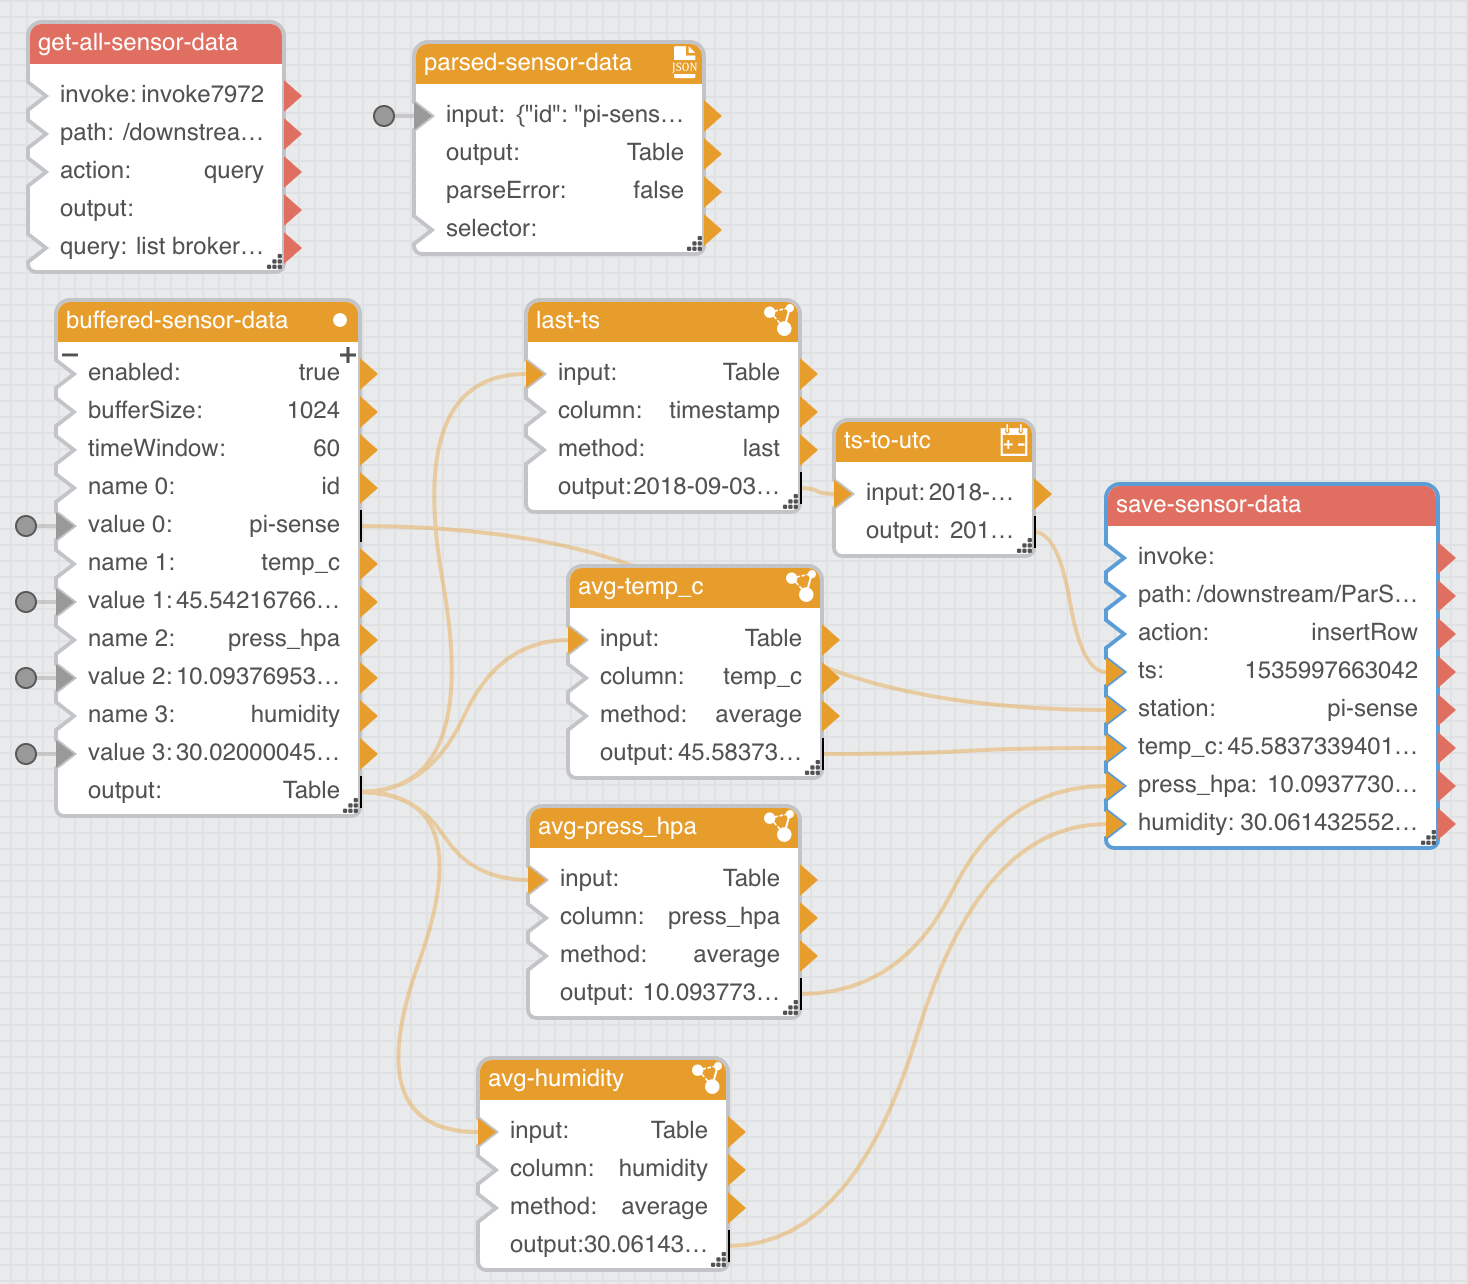
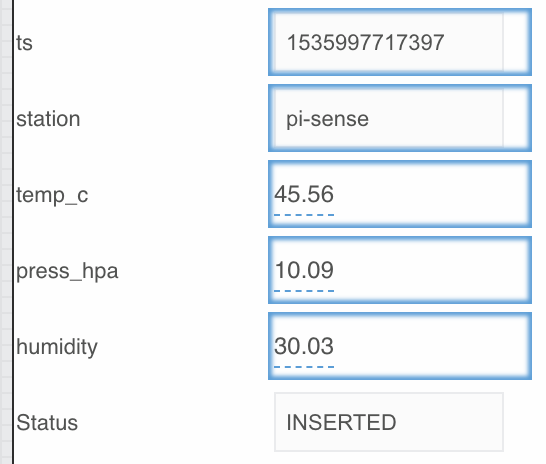
As before, you will fully confirm whether this dataflow is working correctly when you configure the dashboard in the next chapter. For now you should see the averaged
save-sensor-datafields update every 3 seconds (the ParStream INSERT itself only happens every 60 seconds per theintervalfield) and see a value ofINSERTEDfor theStatusfield in itsPropertiessection.
- Close the
save-sampled-sensor-datadataflow by clicking thexicon next to its name above the editor workspace - Close the Dataflow Editor